12 Tips & Tricks for Official Photographers at Public Cosplay Photo Shoots
By Skywing Knights // January 14, 2026
Hello my dears!
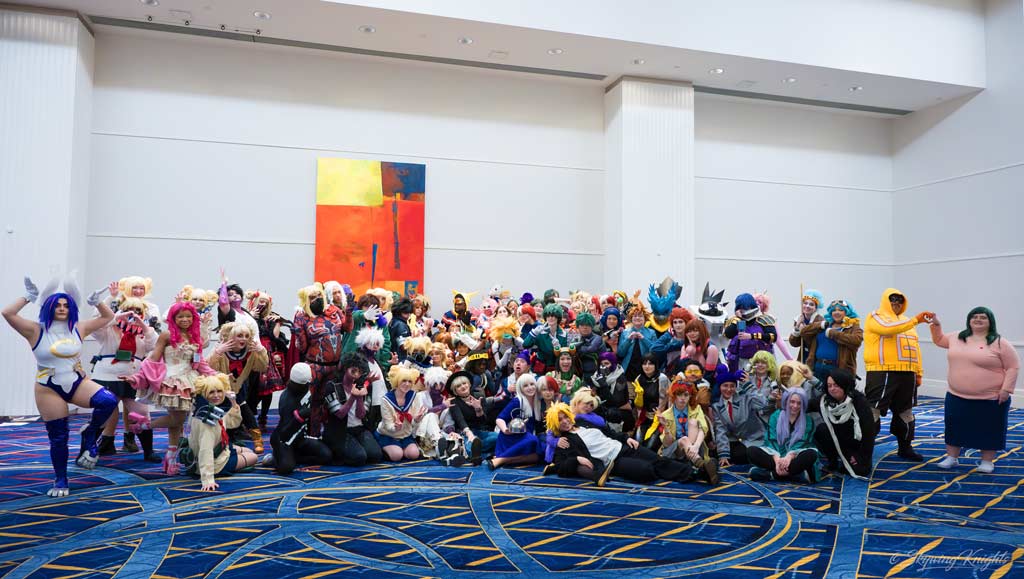
Doing photography work for a cosplayer can be so much fun. Directing them, posing them, angling the light so it hits them just right – all of that can be super satisfying. So you’d think doing photography work for a group of cosplayers would be even more fun. But in reality, it can be… intimidating, for a number of reasons. (They are still EXCELLENT experiences though!) This is exactly what photographers acting as official photographers for cosplay group meetups at conventions have to do. So how do you handle such a huge gig?
Last year, I did this several times and I learned a lot. So I wanted to share with you some of the tips and tricks I learned to make your experience doing the same a little easier. But first, let’s talk about why it’s harder to shoot a large group of cosplayers rather than just one or a small group of them.
Shooting Under Pressure
When you take photos of one or only a small group of cosplayers, you have far more control over the photo shoot. You can take more time to instruct a cosplayer with their poses. You can talk with your clients beforehand about what they’re looking for. You can move from location to location if one place isn’t working out. You can play with angles and settings more because you’re not stressed for time. You also typically only have a set number of deliverables, which you can take your time to work on in post.
A group cosplay meetup offers you next to NONE of those controls. You often don’t know anyone other than the coordinator(s) prior to the shoot. There is no moving locations (typically). Your lighting is your lighting (get over it). There is no ‘time’ when you have 150 people to take photos of (in only one hour) to play with settings. Oh, and your deliverables? Not 5. Not even 10. Try HUNDREDS. And these are samples of your work that could get you more jobs.
Needless to say, planning ahead for meetup gigs is KEY to success. So read on to see what tips and tricks I’ve learned are critical to getting good results.
All the Tips and Tricks

1. PRE-TEST, TEST, AND RE-TEST YOUR SETTINGS!!
I can NOT stress this one enough. During a public cosplay photo shoot, if you are responsible for getting photos of all of the groups, you will likely NOT have time to change your settings or to test them. This is especially true for large shoots with over 50 or 100 people in attendance.
So, go to the location early and test your settings. If it’s indoors, try to go sometime not the day of the shoot (so you’re not competing for space to test). If it’s outdoors, try to go on a sunny day around the same time as the planned shoot time. This way, if it is sunny, you can account for shadows/shade. If it’s cloudy, you can set your camera to the same settings you would use to shoot anywhere on a cloudy day.
And when you test your settings, bring a model to help if possible. Test out how close or how far away you will need to be to get your shots too. Try especially to find a spot where you won’t have to move to get everyone in the frame.
Finally, and this is big – ALWAYS try out multiple settings AND load them into your computer / photo editing software to evaluate them BEFORE the shoot begins. Why? Because this way you can find the perfect settings before the shoot starts. It will help you eliminate grain, check for things being out of focus, and avoid lighting issues.
Once you have found your favorite ‘all rounder’ setting, next….

2. DO NOT Change Your Settings During the Shoot.
This is going to be KEY when it comes to post work. If you change your settings at all, then you will have far more work to do in post when you are editing your photos. So to keep things simple and stream lined, NEVER change your settings UNLESS you are having serious issues that you did not foresee. (And if changing settings will resolve those issues). Now let’s talk equipment…

2. Use a Zoom Lens.
Above all else, use a Zoom lens. I know that many people swear by a certain lens, and that is perfectly OK. However, the thing about non-zoom lens during a cosplay photo shoot is that they are in fact very tiresome to use and will make you do a lot more work than you need to… or than might even be appropriate. Let me explain.
If you have a zoom lens, you do not have to move around at all to get shots of both groups and individuals. With lenses that don’t zoom, you are limited to getting either group shots only or close up shots only (because you can’t really move around a lot during a shoot if your lens can’t zoom – there’s lots of people at these things!). If you did, you’d be getting in the faces of the cosplayers, blocking others’ shots, and you will possibly be showing favoritism or appearing to favor certain cosplayers (which you absolutely should be avoiding regardless.) A zoom lens will allow you to stay in one place (generally), to get group shots and to get close ups from far away. For that reason, a zoom lens is a necessity.
Additionally, while you might have different lenses that can serve well for close ups and full group shots, the idea of changing lenses between those is not practical in a high paced setting like a public cosplay photo shoot. You will not have time with large shoots to do this and every time you change your lens, you risk dust getting on your camera’s sensors. Don’t risk it here. The only potential workaround to this is to use two cameras, which you’d both have to carry, and more than likely, it would require you to move around A LOT to get good shots. Avoid it and stick to using a zoom lens, even if you want to use two cameras – which leads me to my next suggestion…

3. Split the Work (if You Can!)
Two cameras isn’t actually a bad idea, though they should still both have zoom lens. Let me explain. If you have an assistant or photography partner, you can have one of you man a camera on a tripod that you will use solely for group shots. This person would only need to zoom in and out depending on how large the groups actually are. Meanwhile, the other individual can run around getting more unique angles and getting close up shots. This can be very helpful because it means you can get more individual shots than would otherwise be possible in most circumstances.
However, if you don’t have an assistant, avoid this structure. I’m sure you’d love to say ‘oh I’ll just use a remote clicker’, but trust me, at that point, you might as well just use one camera. It is difficult to use a remote and shoot with another camera at the same time.
You also will end up with group photos that have very full groups that fit the frame well and some that don’t because the groups are very small (because you won’t be there to zoom). This would lead to more work for you in post (cropping). You also may even accidentally cut people off because you won’t be able to check if they’re in the frame if you’re doing it remotely (some people do not hear where you tell them to stand). Pressing a second button constantly that you’re holding awkwardly can also be distracting. So if you don’t have an assistant or a photography partner, skip this method. Just do the work with one camera.

4. Use Cones and Painter’s Tape.
Cones? Painter’s Tape? For what? For defining where you want people to stand! With large cosplay meetups, you need to make sure people know where to stand so that they’re in a shot. Having Cones and/or Painters tape to help do that for you is one of the best methods of clearly outlining to people if they are in a shot or not. (Here’s a good set of cones to use!)
In addition, this also helps you to keep those who shouldn’t be in the shot out of your shots along with any bags or items cosplayers may have brought with them. Trust me when I say that I wish I had done this from day one. It would have allowed for much clearer group shots. However, before you do this, make sure you do the next point on this list.

5. Coordinate and Talk to the Meetup Host/Coordinator Before Hand – and Use a Contract if Possible.
Ultimately, the Meetup Host(s)/Coordinator(s) is/are your primary client(s), not those who attend the event, especially if there’s any kind of payment involved. They’re the ones that are ‘getting what they want’ out of the shoot as they’re the ones putting the most time and effort (and sometimes money) into it. Talk to them about –
- If payment is involved, how that will be processed
- The line up/order of cosplayers/cosplay groups
- How many groups of cosplayers you’ll be taking photos of
- How much time you’ll have
- The series (if you’re not familiar with it – though you should absolutely do your own research for a large event like this too)
- Using cones and painter’s tape (so they’re aware)
- If you need an assistant / will have a second photographer helping you
- Self-promotion for yourself during the event and if that’s allowed
- Using a secondary headset voice amplifier (we’ll discuss this one next) for yourself
- When they can expect the photos by (I suggest providing a rough estimate as you likely won’t know how many photos you may end up taking or how long edits may actually take)
- How photos will be shared digitally to all who attend
- What staying late might entail
- And anything else you can think of!
Ultimately, this is important to do because you want to know what they expect out of you and to tell them what you will be providing / what you would like in return.
Even better is if you can nail down and provide a contract for them to sign as this will keep both parties in line and knowing what is expected from both sides.

6. Use a Headset Voice Amplifier/Microphone.
With so many people at a meetup, it can be hard to be heard over the noise. While the meetup host/coordinator should have their own set and should be responsible for directing the crowd overall (check to make sure this is the case though), having one yourself can be great too. The coordinator might not be standing by you during the event and might not be able to hear you if you need them to pause for any reason (changing camera cards/batteries for example- which we’ll also talk about). Having one will also allow you to speak to the crowd behind you (if you need them out of the shot) or to the cosplayers “on stage” in front of you.
Particularly for the latter, you may need them to move together, move back, move forward, spread out, request/remind them to hide any convention badges, etc. These are all valid reasons to have your own microphone, like the one pictured above which you can buy and find linked here, particularly because the host/coordinator will be concentrating on the time and the groups, not necessarily the shots being taken (that’s your job!!).

7. Bring Back Up Batteries and Camera Memory Cards.
This should be something that you are doing anyway as a professional photographer. But I’m going to add it in here as a reminder because you’d be surprised by how many people forget and how many times it’s saved my butt. Bring them. Bring an extra battery or two and a set of SD (memory) cards. Especially with memory cards, it’s REALLY easy to fill them up at these events as you can take dozens and dozens of photos in the blink of an eye. So just bring them! And avoid the embarrassment of having to say to the host, “Sorry, I’m out of memory space.” You’ll thank yourself later, trust me.

8. Bring a Giant QR Code for Album Sharing and Social Media Sharing Along with Business Cards.
If your host allows you to provide self promotional materials, ABSOLUTELY bring business cards with you. But perhaps something that is even more useful is a giant QR Code for people to scan that takes them directly to your website, linktree, or ideal social media platform. All this needs to be is a QR code with your name/logo on a regular sheet of paper. And you can bring a couple if that helps. Why bring this/these? Well, you might not be able to give everyone a business card, but from afar, EVERYONE can scan a QR Code.
So don’t underestimate the power of bringing both. The more people who have access to ways to get in touch with you, the more clients you can get in the future. Additionally, people will want to follow you on your website and socials especially after a shoot. Why? Because they will be looking to you to post the photos. (So DEFINITELY don’t forget to post about that either once photos are done!)

9. Arrive Early and Plan to Stay Late.
Yes, you should plan to arrive early to test your camera settings and to set up (again). However, plan to stay late as well, even if you’re not being paid for that time. The reason? Again – Networking!! Post-shoot times are an EXCELLENT time to network and possibly meet new or future clients. As the primary photographer of the shoot, everyone will be looking to follow your work so they can see the photos.
So talk to as many people as you can who attend! Also, try to do your best to make note of attendees’ social media accounts and the cosplays they wore. It will be a huge help after the fact when you’re trying to tag everyone on socials. (And doing this will get you a lot more views/foot traffic!) So do your best to take the time to stay late. Don’t whisk off to somewhere else if you can help it.

10. Prioritize Group Shots, Followed by Solo / Close Up Shots.
Your goal is to get as many photos of everyone as you can as the primary photographer of a cosplay meetup (at least one of each person). For that reason, it is imperative that you prioritize group shots over solos and close ups. I know solos and close ups can be the most tempting, especially if you see a cool cosplay that you like. But it’s not your job to zero in on only a few individuals. You need to get photos of everyone. So swallow those temptations and get your group shots first and if you have time, follow up with the close ups and solos.
Tip #1 – Try to get different angles of your group shots. This will show that you’re truly thinking of the composition of your shots, and that you’re not just someone clicking a button.
Tip #2 – For courtesy’s sake, do NOT ask for only one cosplayer to pause so you can get a solo during a shoot. It’s rude and shows favoritism. So avoid that, please.

11. Try Your Best to Get a Variety of Individuals in Your Solo and Close Up Shots.
While group shots are your priority, to make hosts feel that they are “getting their money’s worth”, even if no money is exchanged, close ups and solos are important to try to get as well. Why? Similar to getting different angles, it shows your versatility and shows your ability to highlight a diversity of people, costumes, and poses. Additionally, while you are taking solos and close ups, do your best to focus on a large variety of people. Try not to go back and shoot solos or close ups of the same person over and over again.
This can be difficult, especially if there’s a cosplayer who has truly put in a lot of time and effort into creating a cosplay that stands out. (These cosplays can really be eye grabbing). But you’re not THAT cosplayer’s photographer – you’re everyone’s photographer (as directed by the host). Photos of the same person in different poses are okay as are the occasional “3 taken quickly in a row” type shots. But try to eliminate the latter especially where possible.
You have a limited amount of time and you NEED to try to get everyone. Is it possible to get solos of everyone? No, probably note. Should you feel bad if you can’t get everyone? Not as long as you tried your best to get as many people as you could, no. I get it though, this is hard, especially when you’re shooting under pressure, during which, photographers often default to what grabs their eye first. Don’t beat yourself up about it if you can’t get solos or close ups of everyone. Just do your best. That’s all anyone will and can ask of you.

12. Eliminate the Bad, Then Edit One and Copy – to Save Your Sanity
Let’s talk post shoot to-do’s. Unless you’re a world renowned photographer, photos are typically not done until they’ve been edited to some degree. But how are you supposed to do that when you take over 1,000 photos and attendees expect photos within a week?
The first step is going to be to go through them quickly and eliminate any blurry photos or photos where the models ‘were not ready’. Typically, you’ll be shooting even when people are getting ready. It’s the nature of the beast. You’ll do that to ensure you get photos of as many people as possible (some people may be ready while others are not and you could take solos or close ups of those people for example before the prime shoot time for a group). But that does mean you’ll likely have some blurry photos. Eliminate those and then move on to the next step.
Now, remember how I said to keep your settings the same through out the shoot? This is why. If all of your settings are the same, then you should only need to edit one photo, copy the settings, and paste the settings to the rest of the photos. For that initial photo, you’re not going to be burning or dodging. Nor are you going to be softening skin or cropping. You’re going to be adjusting the lighting and colors of the whole photo, possibly eliminating grain if it’s there or sharping photos. And then you’re going to call it good.
Then, in your software of choice, copy those edits to all of the other photos. And you’ll be done. Depending on the software, your ability to do this may vary, but just do your best. It will be the most efficient way to edit photos and get them done and out quickly. You’re welcome.
The Final Results
And that’s it! There’s a ton more that you can likely do, depending on your unique circumstances. However, these are the most universal tips and tricks I found that work when shooting large group meetups of cosplayers. Will you have the same creative freedom as you would shooting solo cosplayers? No. But that DOESN’T mean that you can’t get good photos of cosplayers at group meetups. Not to mention, while these can be high pressure events, they can also be a lot of fun! You’ll likely meet a number of new friends, possible clients, and people with similar interests to you (especially if you know the series).
And who knows? One day, I may even write an article providing tips and tricks for cosplayers at these shoots as well. (Keep an eye out for that one day!). Until then, I hope these help and happy shooting!
~Skywing